JavaFX 8 Tutorial - Part 1: Scene Builder
Tutorial 1
දැනට කරපු Tutorials බලාගන්න බැරි උනානම් පහල තියන link වලට ගිහිල්ලා ඒ දේවල් බලලා මේ Tutorial එකට එන්න.
Part 0 : Introduction
Part 1 : Scene Builder
Part 2 : Model and TableView
Part 1 : Scene Builder
Part 2 : Model and TableView
Part 3 : Interacting with User
Part 4 : CSS Styling
Part 5 : Storing Data as XML
Part 6 : Statistic Charts
Part 7 : Deployment
මේ Tutorial එකේදි කතා කරන්නේ Part 1 : Scene Builder එක ගැන.


ඉතිං මේ Tutorial එකෙන් බලපොරොත්තු වෙන්නෙ මෙන්න මේ User Interface එක Scene Builder වලින් කොහොමද හදාගන්න යන්නෙ කොහොමද කියලා.
මේකෙදි මෙන්න මේ Topics ටික ගැන කරනවා.
Topics
මං මේ Project එක අරන්න යන්නෙ IntelliJ IDEA වලින්.කැමතිනම් ඔයාල ඉහත කියල තියන ඕනෑම IDE එකකින් කරන්න.
ඉස්සෙල්ලම IntelliJ Configurations කරගෙන ඉන්න වෙනවා.
මේකෙදි මෙන්න මේ Topics ටික ගැන කරනවා.
Topics
- Getting to know JavaFX
- Creating and starting a JavaFX Project
- Using Scene Builder to design the user interface
- Basic application structure using the Model-View-Controller (MVC) pattern
මේකෙදි අපිට අවශ්ය කරන Prerequisites ටිකක් තියනවා.
Prerequisites
- Latest Java JDK 8 (includes JavaFX 8).
- Eclipse 4.4 or greater with e(fx)clipse plugin Or IntelliJ IDEA Or NetBeans IDE.The easiest way is to download the preconfigured distro from the e(fx)clipse website. As an alternative you can use an update site for your Eclipse installation.
- Scene Builder 8.0
ඉතිං මේ දේවල් ටික ඔයාල Download කරලා Install කරගන්න සිද්ද වෙනවා.
මං මේ Project එක අරන්න යන්නෙ IntelliJ IDEA වලින්.කැමතිනම් ඔයාල ඉහත කියල තියන ඕනෑම IDE එකකින් කරන්න.
ඉස්සෙල්ලම IntelliJ Configurations කරගෙන ඉන්න වෙනවා.
IntelliJ Configurations
- Open the IntelliJ and go to the File then Select Project Structure
- Click New..., select Set up Project SDK and choose JDK after that choose the installation Directory of your JDK 8.
- Remove the other JREs or JDKs so that the JDK 8 becomes the default.

- Modules Select to Compiler compliance level to 1.8.

- Navigate to the JavaFX preferences. Specify the path to your Scene Builder executable.Go to the Setting and Choose JavaFX in the Languages & frameworks.


ඔයාලට පහල තියන link ටික ඕන වෙයි වැඩි දුරටත් මේවා ඉගෙන ගන්න.
- Java 8 API - JavaDoc for the standard Java classes
- JavaFX 8 API - JavaDoc for JavaFX classes
- ControlsFX API - JavaDoc for the ControlsFX project for additional JavaFX controls
- Oracle's JavaFX Tutorials
අපි දැන් පටන්ගමු අපේ AddressApp Project එක.
Create a new JavaFX Project
File -> New -> Project යන පිලිවෙලට ගියම ඔයාලට අලුත් Project එකක් පටන් ගන්න පුලුවන්.ඒකට ඔයාලට කැමති නමක් දෙන්න.(Example AddressApp) and click Finish.
Create the Packages
Good software design principles එකට අනුව මං මුලින් කිව්ව MVC Architecture එක් මේකෙදී Use කරනව කියලා. Model-View-Controller (MVC)
අපි පහත දැක්වෙන ඉදියට Package ටික වෙන් කරගමු.
(Right-click on the src-folder, New... | Package):
ch.makery.address- contains most controller classes (=business logic)ch.makery.address.model- contains model classesch.makery.address.view- contains views
Create the FXML Layout File
User Interface එකක්හ් ඩ් න ක්රම 2ක් තියනවා.
- XML File භාවිතා කරන්න පුලුවන්.
- Java තුල පවතින Programming දෙවල් භාවිතා කරන්න පුලුවන්.
මේකෙදි අපි XML(ending in .fxml) තමයි යොදාගන්නෙ.
අපි හැම Interface එකක්ම හදන්නේ view Package එක ඇතුලේ.
Right-click on the view package and create a new FXML Document called
PersonOverview
ඊලගට අපි මෙක Design කරගන්න ඕන.
Design with Scene Builder
Right-click on
PersonOverview.fxml and choose Open with Scene Builder.
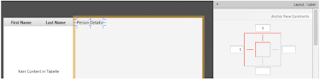
දැන් ඔයාලට Scene Builder එකත් එක්කම AncherPane (visible under Hierarchy on the left) දකින්න ලැබේවි.
දැන් පහතින් තියන පිලිවෙලට Design එක හදාගමු.
- Select the Anchor Pane in your Hierarchy and adjust the size under Layout (right side):

- Add a Split Pane (Horizontal Flow) by dragging it from the Library into the main area. Right-click the Split Pane in the Hierarchy view and select Fit to Parent.

- Drag a TableView (under Controls) into the left side of the SplitPane. Select the TableView (not a Column) and set the following layout constraints to the TableView. Inside an AnchorPane you can always set anchors to the four borders (more information on Layouts).

- Go to the menu Preview | Show Preview in Window to see, whether it behaves right. Try resizing the window. The TableView should resize together with the window as it is anchored to the borders.
- Change the column text (under Properties) to "First Name" and "Last Name".

- Select the TableView and choose constrained-resize for the Column Resize Policy (under Properties). This ensures that the colums will always take up all available space.

- Add a Label on the right side with the text "Person Details" (hint: use the search to find the Label). Adjust it's layout using anchors.
- Add a GridPane on the right side, select it and adjust its layout using anchors (top, right and left).

- Add the following labels to the cells.
Note: To add a row to the GridPane select an existing row number (will turn yellow), right-click the row number and choose "Add Row".
- Add a ButtonBar at the bottom. Add three buttons to the bar. Now, set anchors (right and bottom) to the ButtonBar so it stays in the right place.

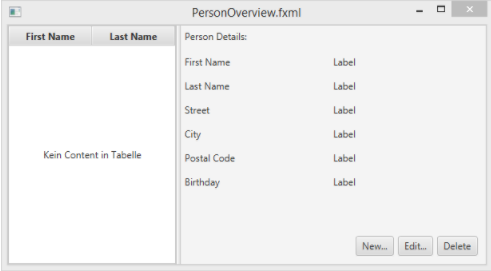
- Now you should see something like the following. Use the Preview menu to test its resizing behaviour.


මේ Interface එක හදාගත්තට පස්සේ අපි යනවා Main Application එක හදාගන්න.
Create the Main Application
අපිට තව ඕන වෙනවා තවත් FXML File එකක්.ඒකත් view Package එක ඇතුලෙම තමයි හදන්නෙ.ඒකට අපි RootLayout.fxml කියලා Name එකක් දෙමු.
මේ RootLayout.fxml එකේ තියෙන්නෙ menu bar එකක් සහා wraps තමයි තියෙන්නෙ.පහල තියන පිලිවෙලට අපි ඒක හදමු.
- Create another FXML Document inside the view package called
RootLayout.fxml. මේ වතාවෙදි අපි AncherPane එකක් නෙවෙයි ගන්නෙ BorderPane එකක්. - Open the
RootLayout.fxmlin Scene Builder. දැන් තියන Ancherane එක Delete කරලා BorderPane එකක් වම් පැත්තේ තියන Library Menu එකෙන් drag and drop කරලා ගන්න. - Resize the BorderPane with Pref Width set to 600 and Pref Height set to 400.

- Add a MenuBar into the TOP Slot. We will not implement the menu functionality at the moment.


The JavaFX Main Class
අපි දැන් Main Class එක හදාගෙන ඉමු.
මේක controller Package එකේ තමයි හදන්නේ.
We'll call the class
MainApp and put it in the controller package ch.makery.address (note: this is the parent package of the view and model subpackages).
මේ Package එක උඩ Right Click කරලා New -> Java Class එකක් ගන්න.
මේ
MainApp.java class එකට extends කරන්න ඕන Application කියන class එක .ඒකෙ methods දෙකක් තියනවා. ගොඩාක්ම වැදගත් method එක තමයි start(Stage primaryStage) method එක. මේකෙන් automatically call කරනවා application එක mainmethod මගින් launched උන වෙලාවෙදි.
මේ start(......) කියන method eඑක එතුලෙ තියනව Stage කියල Parameter එකක්.ඒක තමයි අපේ window එක.පහල තියන Photo එකෙන් තෙරුම් gගන්න උලුවන් JavaFX Application වල මූලිකවම පිටතින් පේන දේ.

Image Source : http://www.oracle.com
මේ Stage එකක් ඇතුලෙ scene තියනව.මේ scene එකක් ඇතුලෙ TextField, AncherPane, TexBox, and What ever..... මේ දේවල් ඇතුලත් වෙනවා.මේ සේරම අන්තර්ගත උනාම තමෛ අපේ Window ව්ක හදගන්න පුලුවන්.
දැන් MainApp.java එක open කරල පහල තියන code එක replace කරන්න.
package ch.makery.address;/* Create by Thilina Chamika on 9/4/2017 (University of Colombo school of computing) */
import java.io.IOException;

import javafx.application.Application;
import javafx.fxml.FXMLLoader;
import javafx.scene.Scene;
import javafx.scene.layout.AnchorPane;
import javafx.scene.layout.BorderPane;
import javafx.stage.Stage;

public class MainApp extends Application {

    private Stage primaryStage;
    private BorderPane rootLayout;

    @Override
    public void start(Stage primaryStage) {
        this.primaryStage = primaryStage;
        this.primaryStage.setTitle("AddressApp");

        initRootLayout();

        showPersonOverview();
    }

    /**
     * Initializes the root layout.
     */
    public void initRootLayout() {
        try {
            // Load root layout from fxml file.
            FXMLLoader loader = new FXMLLoader();
            loader.setLocation(MainApp.class.getResource("view/RootLayout.fxml"));
            rootLayout = (BorderPane) loader.load();

            // Show the scene containing the root layout.
            Scene scene = new Scene(rootLayout);
            primaryStage.setScene(scene);
            primaryStage.show();
        } catch (IOException e) {
            e.printStackTrace();
        }
    }

    /**
     * Shows the person overview inside the root layout.
     */
    public void showPersonOverview() {
        try {
            // Load person overview.
            FXMLLoader loader = new FXMLLoader();
            loader.setLocation(MainApp.class.getResource("view/PersonOverview.fxml"));
            AnchorPane personOverview = (AnchorPane) loader.load();

            // Set person overview into the center of root layout.
            rootLayout.setCenter(personOverview);
        } catch (IOException e) {
            e.printStackTrace();
        }
    }

    /**
     * Returns the main stage.
     * @return
     */
    public Stage getPrimaryStage() {
        return primaryStage;
    }

    public static void main(String[] args) {
        launch(args);
    }
}
දැන් Application එක Run කරලා බලන්න උඩම තියන screenshot එකේ විඩියට Interface එක එනවද කියලා.
Frequent Problems
සමහර අයට මේ වගේ error message එකක් එවි.
java.lang.IllegalStateException: Location is not set.
එහෙම එන්නෙ ඔයා ඔයගේ fxml
file එක JavaFX එකට හොයාගන්න බැරි විදියට තිබ්බොත්.එහෙම error එකක් අවොත් ,
What's Next?
ඊලගට Tutorial එකෙන් Part 2 : Model and TableView ගැන කතා කරනවා.
