JavaFX 2 Tutorial - Part 2: Model and TableView
දැනට කරපු Tutorials බලාගන්න බැරි උනානම් පහල තියන link වලට ගිහිල්ලා ඒ දේවල් බලලා මේ Tutorial එකට එන්න.
Part 0 : Introduction
Part 1 : Scene Builder
Part 2 : Model and TableView
Part 1 : Scene Builder
Part 2 : Model and TableView
Part 3 : Interacting with User
Part 4 : CSS Styling
Part 5 : Storing Data as XML
Part 6 : Statistic Charts
Part 7 : Deployment

Topics in Part 2
Model Class එකක් Create කිරීම.
Model එකක් Create කිරීම.
Model Class එක තුල ObservableList එකක් Use කිරීම.
Controllers Class යොදාගෙන TableView එකක් තුල දක්ත නිරූපනය කිරීම.
Create the Model Class
මේකෙදි අපි Employees කිහිප දෙනෙකුගේ Address Save කරන Project එකක් කියල හිතමු.මේකට අවශ්යය වෙනවා Person ලා විශාල ප්රමානයක්.එක Person කෙනෙක්ගේ Address එකක් ගත්තම ඒක තුල First Name, Last Name,Street, Postal Code,City, Birthday එක වගේ ගොඩාක් දේවල් ඇතුලත් වෙනවා.ඒ Model Class එක Person කියලා නම් කරමු.ඒ Class එක model Package එක තුල Create කරමු.(ch.makery.address.model)
Person.java Class එකට පහල තියන Code එක Copy කරගන්න.
package ch.makery.address.model;

import java.util.Calendar;

/**
 * Model class for a Person.
 *
 * @author Thilina Chamika(University of Colombo School Of Computing)
 */
public class Person {

    private String firstName;
    private String lastName;
    private String street;
    private int postalCode;
    private String city;
    private Calendar birthday;

    /**
     * Default constructor.
     */
    public Person() {
    }

    /**
     * Constructor with some initial data.
     *
     * @param firstName
     * @param lastName
     */
    public Person(String firstName, String lastName) {
        this.firstName = firstName;
        this.lastName = lastName;

        // some initial dummy data
        this.street = "some street";
        this.postalCode = 1234;
        this.city = "some city";
        this.birthday = Calendar.getInstance();
    }

    public String getFirstName() {
        return firstName;
    }

    public void setFirstName(String firstName) {
        this.firstName = firstName;
    }

    public String getLastName() {
        return lastName;
    }

    public void setLastName(String lastName) {
        this.lastName = lastName;
    }

    public String getStreet() {
        return street;
    }

    public void setStreet(String street) {
        this.street = street;
    }

    public int getPostalCode() {
        return postalCode;
    }

    public void setPostalCode(int postalCode) {
        this.postalCode = postalCode;
    }

    public String getCity() {
        return city;
    }

    public void setCity(String city) {
        this.city = city;
    }

    public Calendar getBirthday() {
        return birthday;
    }

    public void setBirthday(Calendar birthday) {
        this.birthday = birthday;
    }
}
A List of Persons
දැන් Person List එකක් හදන්න යන්නේ. MainApp.java Class එක ඇතුලේ ObservableList එකක් හදලා ඒකට Data ටිකක් Add කරන්න තමයි දැන් හදන්නේ.
ObservableList
මේක Arrya එකක්.Array එකක් අපි සාමාන්යයයෙන් Use කරන්නේ දක්ත Save කරලතියාගන්න. MainApp.java එක තුල ObservableList එකක් හදලා ඒකට Data Add කරන විදිය පහල තියනවා.ඒ Code එක MainApp.java Class එකට Copy කරන්න.
MainApp.java
import javafx.collections.FXCollections;
import javafx.collections.ObservableList;

  // ...

    /**
     * The data as an observable list of Persons.
     */
    private ObservableList<Person> personData = FXCollections.observableArrayList();

    /**
     * Constructor
     */
    public MainApp() {
        // Add some sample data
        personData.add(new Person("Thilina", "Chamika"));
        personData.add(new Person("Saman", "Kumara"));
        personData.add(new Person("Hansini", "Indrachapa"));
        personData.add(new Person("Madhawa", "Thusith"));
        personData.add(new Person("Ravi", "Hansa"));
        personData.add(new Person("Heshan", "Harsha"));
        personData.add(new Person("Sisira", "Jayewardhane"));
        personData.add(new Person("Dulanka", "Senewirathna"));
        personData.add(new Person("Nethmi", "Nishadi"));
    }

    /**
     * Returns the data as an observable list of Persons.
     * @return
     */
    public ObservableList<Person> getPersonData() {
        return personData;
    }
// ...
අපිට අවශ්යය වෙලාවට Person කෙනෙක් ගන්න උවමනා උනාම අපි getPersonData() කියන method එකට call කලාම හරි.
The PersonOverviewController
හරි දැන් අපිට Controller Class එක හදාගන්න යන්නේ අපි හදාගත්ත
PersonOverview.fxml UI එකට.Java Class එකක් හදන්නPersonOverviewController.java. නමින්.- UI එකෙ තියන Fields වලට ගැලපෙන විදියට instance variables ටිකක් අපි හදාගන්න් ඕන.
PersonOverviewController.java
package ch.makery.address.view;

import javafx.fxml.FXML;
import javafx.scene.control.Label;
import javafx.scene.control.TableColumn;
import javafx.scene.control.TableView;
import ch.makery.address.MainApp;
import ch.makery.address.model.Person;

public class PersonOverviewController {
    @FXML
    private TableView<Person> personTable;
    @FXML
    private TableColumn<Person, String> firstNameColumn;
    @FXML
    private TableColumn<Person, String> lastNameColumn;

    @FXML
    private Label firstNameLabel;
    @FXML
    private Label lastNameLabel;
    @FXML
    private Label streetLabel;
    @FXML
    private Label postalCodeLabel;
    @FXML
    private Label cityLabel;
    @FXML
    private Label birthdayLabel;

    // Reference to the main application.
    private MainApp mainApp;

    /**
     * The constructor.
     * The constructor is called before the initialize() method.
     */
    public PersonOverviewController() {
    }

    /**
     * Initializes the controller class. This method is automatically called
     * after the fxml file has been loaded.
     */
    @FXML
    private void initialize() {
        // Initialize the person table with the two columns.
        firstNameColumn.setCellValueFactory(cellData -> cellData.getValue().firstNameProperty());
        lastNameColumn.setCellValueFactory(cellData -> cellData.getValue().lastNameProperty());
    }

    /**
     * Is called by the main application to give a reference back to itself.
     *
     * @param mainApp
     */
    public void setMainApp(MainApp mainApp) {
        this.mainApp = mainApp;

        // Add observable list data to the table
        personTable.setItems(mainApp.getPersonData());
    }
}
- මෙකේදි අපි හදන හැම Field එකකටම සහ Methods වලට @FXML කොටස දැමීම අනිවාර්යයි.
- initialize() Method එක Automaticaly Call වෙනවා අපේ UI එක Load වෙලා ඉවර උනාම.
- අපි මෙහිදි Lambdas Functions යොදාගෙන තියනවා Table එකෙ Columns වලට Data ගැනීමට.
firstNameColumn.setCellValueFactory(cellData -> cellData.getValue().firstNameProperty());
Connecting MainApp with the PersonOverviewController
setMainApp(...) method එකට අපි MainApp class එකේ ඉඳල Call කරන්න ඕන.ඒ Call කරන වෙලාවෙදි අපේ UI එක Load වෙලා Person Data ටික අපේ Table එකේ Display වෙන්න ඕන.ඒක් කරන්නෙ අපි Constructor එක පහල විදියට Code එක හදාගන්න ඕනී.showPersonOverview() method එක පහලා Code එකේ විදියට re-place කරන්න./** * Shows the person overview inside the root layout. */ public void showPersonOverview() { try { // Load person overview. FXMLLoader loader = new FXMLLoader(); loader.setLocation(MainApp.class.getResource("view/PersonOverview.fxml")); AnchorPane personOverview = (AnchorPane) loader.load(); // Set person overview into the center of root layout. rootLayout.setCenter(personOverview); // Give the controller access to the main app. PersonOverviewController controller = loader.getController(); controller.setMainApp(this); } catch (IOException e) { e.printStackTrace(); } }
Hook the View to the Controller
දැන් අපේ
PersonOverview.fxml එකට කියන්න ඕනී අපේ Controller එක මොකද්ද කියලා.- Open
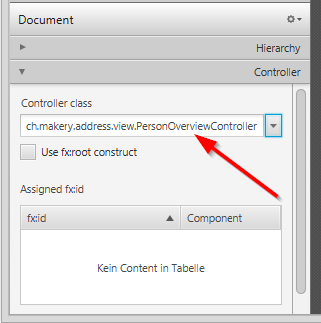
PersonOverview.fxmlwith the SceneBuilder. - Open the Controller group on the left side and select the
PersonOverviewControlleras controller class.(මේ පිංතූරේ විදියට අපේ Controller Class එක ඔකද්ද කියලා කියන්න ඕන.)
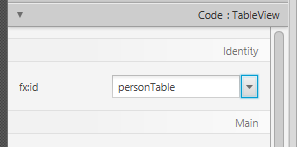
- Select the
TableViewin the Hierarchy group and choose in the Code group thepersonTablefield as fx:id.(අපේ Class එකේ තියන instance variable වල නම fx:id එකට දාන්න ඕන.)
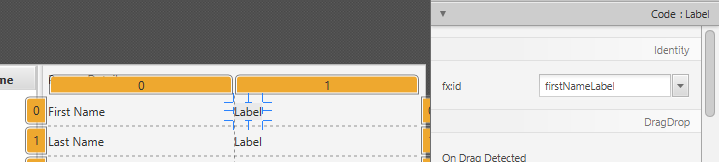
- Do the same for the columns and select
firstNameColumnandlastNameColumnas fx:id respectively. - For each label in the second column, choose the corresponding fx:id.
- Important: refresh the entire AddressApp project (F5).
Start the Application
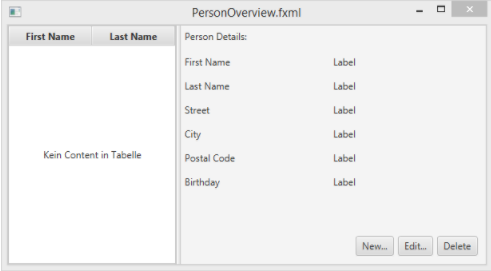
දැන් අපේ App එක Run කලාම මේ Blog එකේ මුලින්ම තියන screenshot එකේ විදියට පෙන්න ඕන.
What's Next?
ඊලගට Tutorial එකෙන් Part 3: Interacting with User ගැන කතා කරනවා.